A Problem Sheet provides problem(s) for the participants to practice with. Once you've created and saved a Problem Sheet, or selected one, you can then select Edit  or
or  next to the item you wish to edit. Select Save to keep the changes, select Cancel to return the sheet.
For each tab (heading), you can add as many Text, Resource (Resources tab), Resource (Directions and Problem tab), or Test Items as you need. Not all areas of a sheet allow for all types of entries. If you leave a tab empty by not adding any entries, then that tab will not output on the Problem Sheet. On this screen, you can:
•Select Edit  to make changes to the General tab information. Make the desired changes then select Save to keep the changes or select Cancel to return to view the sheet.
•Select Explain Flag  to review the reasons a resource has been flagged.
•View or download a Resource entry, if a link is shown and you have the correct software available.
•Add or Edit  a selected Text, Note, Caution, Warning, or Test Item
  entry.
•Add a Resource  entry and Edit
  a selected resource on the Resources tab.
•Add a Resource  entry and Edit
  a selected resource on the Directions and Problem tab.
•Convert a Text entry to a Note, Caution, Warning entry, if needed.
•Delete  a selected Text, Note, Caution, Warning, Resource, or Test Item entry. Once you've selected OK to the confirmation message, an Undo button displays on the bottom left of the screen that allows you to revert the deletion.
•Copy  /Paste
  a selected Text, Note, Caution, Warning, Resource, or Test Item entry.
•Move a selected Text, Note, Caution, Warning, Resource, or Test Item entry Up  or Down
  in the list of entries to resequence the list of entries.
The Problem Sheet screen allows you to enter the following information on the following tabs:
•General - including the Title of the sheet.
•Introduction (Text) - to the problem(s).
•Resources (Resources) - the available resources.
•Directions (Text and Resources) - the directions and procedures to use to solve the problem(s).
•Problem (Text, Resources, and Test Items) - the problem(s) to be solved.
General Tab (Up to Tab List)

Figure 242: Problem Sheet - General Tab
Title
The Title of the sheet displays in the participant guide and when the sheet is cited in a sub-element.
Type
The Type of sheet.
Introduction Tab (Up to Tab List)

Figure 243: Problem Sheet - Introduction Tab
The Introduction to the problem(s) to be solved. You can include as many Text entries as needed.
Resources Tab (Up to Tab List)

Figure 244: Problem Sheet - Resources Tab
The Resources tab lists the available resources to solve the problem(s), which can include Before and After text.
Directions Tab (Up to Tab List)

Figure 245: Problem Sheet - Directions Tab
The Directions detail the procedures and other information needed to solve the problem(s). You can include as many Text or Resource entries as needed. When you select an IMM graphic with an associated JPG, JPEG, or PNG file, you can use the Width, Rotation, and Alignment fields to adjust how your graphic will display on the Problem Sheet.
Problem Tab (Up to Tab List)

Figure 246: Problem Sheet - Problem Tab
The Problem tab details the problem(s) to be solved. You can include as many Text entries, Resources, or Test Items as needed.
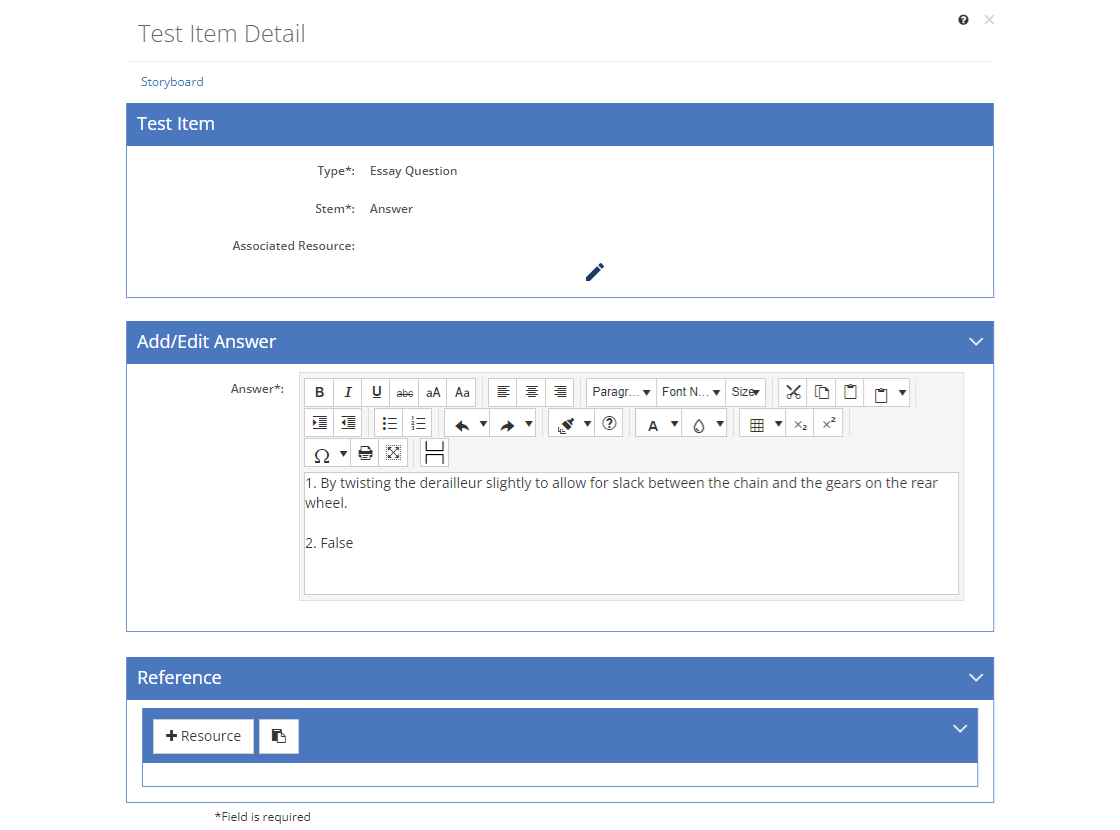
If you add a text entry with one or more questions instead of one or more test items and you want to include the answer(s) in the Answer Key in the back of the IG, as happens with the other test item types, then you need to add an Essay Question test item to capture the answer(s):

Figure 247: IG Answer Key - Sheet Text Questions - Essay Question Answer Example
1.Set the Stem to Answer.
2.Enter the answer text that should be output in the Answer Key in the back of the IG in the Add/Edit Answer text box.