On the Role screen:
•Select ![]() to create a new role.
to create a new role.
•Select View  to review a selected role. If you need to make any changes, select Edit on the Role Detail screen.
•Select Edit  to make changes to a selected role.
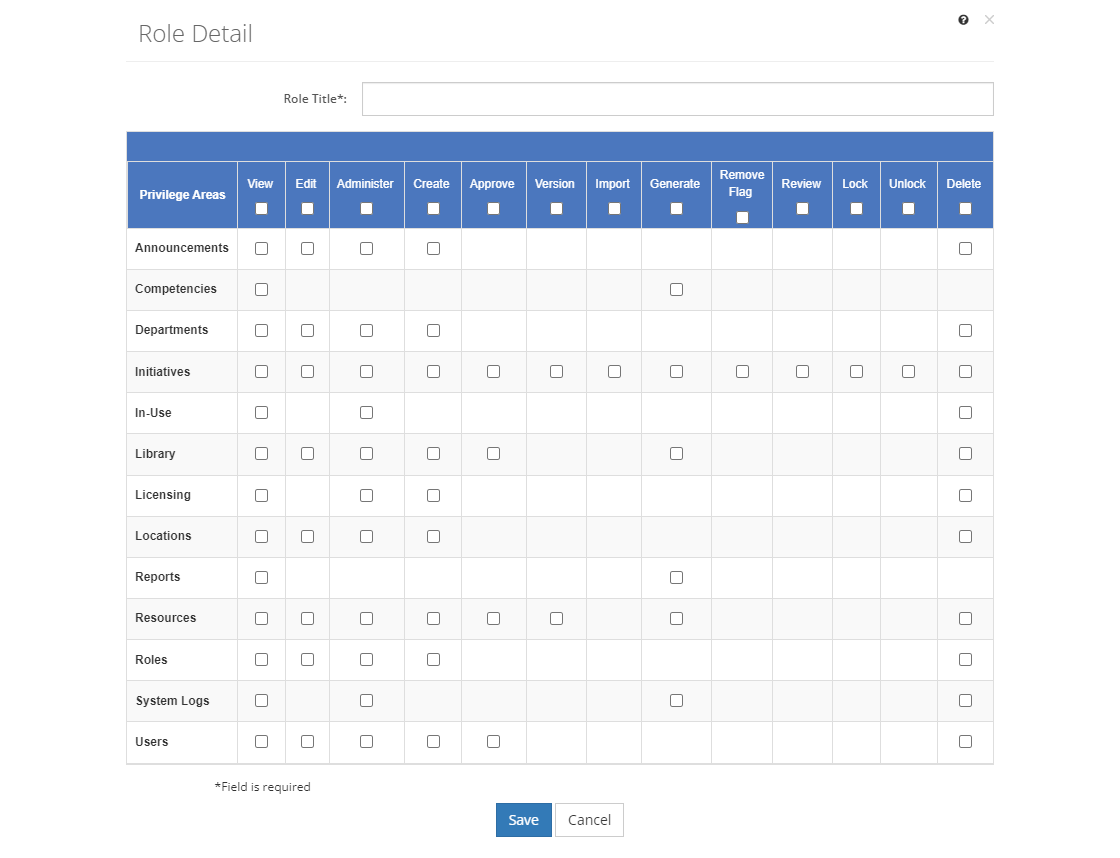
Any of these options opens the Role Detail screen, ready for you to enter, review, or update the fields below.

Figure 382: Role Detail Screen
•To create a new role, select Save once you've entered all the information. Likewise, to keep the edits you've made to an existing role, select Save. This will return you to the list of roles.
•If you do not want to keep the edits or create a new role, just select Cancel to close the pop-up.
•If you're reviewing a role, you can select Edit to make changes or you can close the pop-up window by selecting the X in the top right of the pop-up.
Role Fields
Role Title
The Role Title is the name or title of the role.
Underneath the role title field is a table with the LEAD Privilege Areas/Tabs going down on the left and the Privileges across the top. A checked box means that the role has the checked privilege for that area/tab in LEAD. You can check the top-most box to give a role that privilege for all areas/tabs in LEAD.
Announcements
Assigns privileges (or rights) to the Announcements screens under the Admin tab.
Competencies
Assigns privileges (or rights) to the Competencies screens.
Departments
Assigns privileges (or rights) to the Departments screens under the Admin tab.
Initiatives
Assigns privileges (or rights) to the Initiatives tab and all screens below that tab.
In-Use
Assigns privileges (or rights) to the In-Use screen under the Admin tab.
Library
Assigns privileges (or rights) to the Library tab and all screens below that tab.
Licensing
Assigns privileges (or rights) to the Licensing screens under the Admin tab.
Initiative Locations
Assigns privileges (or rights) to the Locations screens under the Admin tab.
Reports
Assigns privileges (or rights) to the Reports tab.
Note: In order for a role with a Reports tab privilege to be able to view the available reports for a specific area (i.e., Library, Initiatives, Resources, or Users > Admin tab), you need to assign the View privilege for those tabs.
Resources
Assigns privileges (or rights) to the Resources tab and all screens below that tab.
Roles
Assigns privileges (or rights) to the Roles screens under the Admin tab.
System Logs
Assigns privileges (or rights) to the System Logs screens under the Admin tab.
Users
Assigns privileges (or rights) to the Users screens under the Admin tab.
LEAD Privileges
Note: Checking the box at the top of the table for a privilege will check the boxes for all areas/tabs in LEAD.
Administer
If the box is checked, this allows someone with this role to Administer or manage all information for the selected area/tab. This privilege includes all other available privileges for the area/tab.
View
If the box is checked, this allows someone with this role to View information for the selected area/tab.
Generate
If the box is checked, this allows someone with this role to Generate outputs and reports for the selected area/tab. Additionally, the View privilege is also included with this privilege.
Create
If the box is checked, this allows someone with this role to Create new entries for the selected area/tab. Additionally, the View privilege is also included with this privilege.
Edit
If the box is checked, this allows someone with this role to Edit entries for the selected area/tab. Additionally, the View privilege is also included with this privilege.
Delete
If the box is checked, this allows someone with this role to Delete data for the selected area/tab, especially data that is not in use elsewhere. Additionally, the View privilege is also included with this privilege.
Review
If the box is checked, this allows someone with this role to Review data for the selected area/tab. This would allow someone to edit the initiative, when (and only when) that initiative is in Lock for Review status. Additionally, the View and Generate privileges are also included with this privilege.
Comment
If the box is checked, this allows someone with this role to Comment on initiatives.
Lock
If the box is checked, this allows someone with this role to Lock items in the initiative, including:
•the initiative itself on the Initiatives > Initiatives screen.
•the TNA and TMD.
•all skills under the Training Needs Analysis folder.
•all objectives.
•the table of contents items on the Develop tab, e.g., the course and individual modules, lessons, sections, and assessments.
Unlock
If the box is checked, this allows someone with this role to Unlock locked items in the initiative.
Remove Flag
If the box is checked, this allows someone with this role to Remove Flag(s) for the selected area/tab. Additionally, the View privilege is also included with this privilege.
Approve
If the box is checked, this allows someone with this role to Approve new entries for the selected area/tab. Additionally, the View privilege is also included with this privilege.
Version
If the box is checked, this allows someone with this role to create a new Version of an existing entry for the selected area/tab. Additionally, the View privilege is also included with this privilege.
Import
If the box is checked, this allows someone with this role to Import data for the selected area/tab. Additionally, the View privilege is also included with this privilege.
Replace
If the box is checked, this allows someone with this role to Replace items on the selected area/tab with another item from that area/tab. The replace functionality allows someone to make changes to approved initiatives when replacing one item with another item.