•Select ![]() to create a new software entry.
to create a new software entry.
•Select View  to review a selected software entry. If you need to make any changes, select Edit on the Software Detail screen.
•Select Edit  to make changes to a selected software entry.

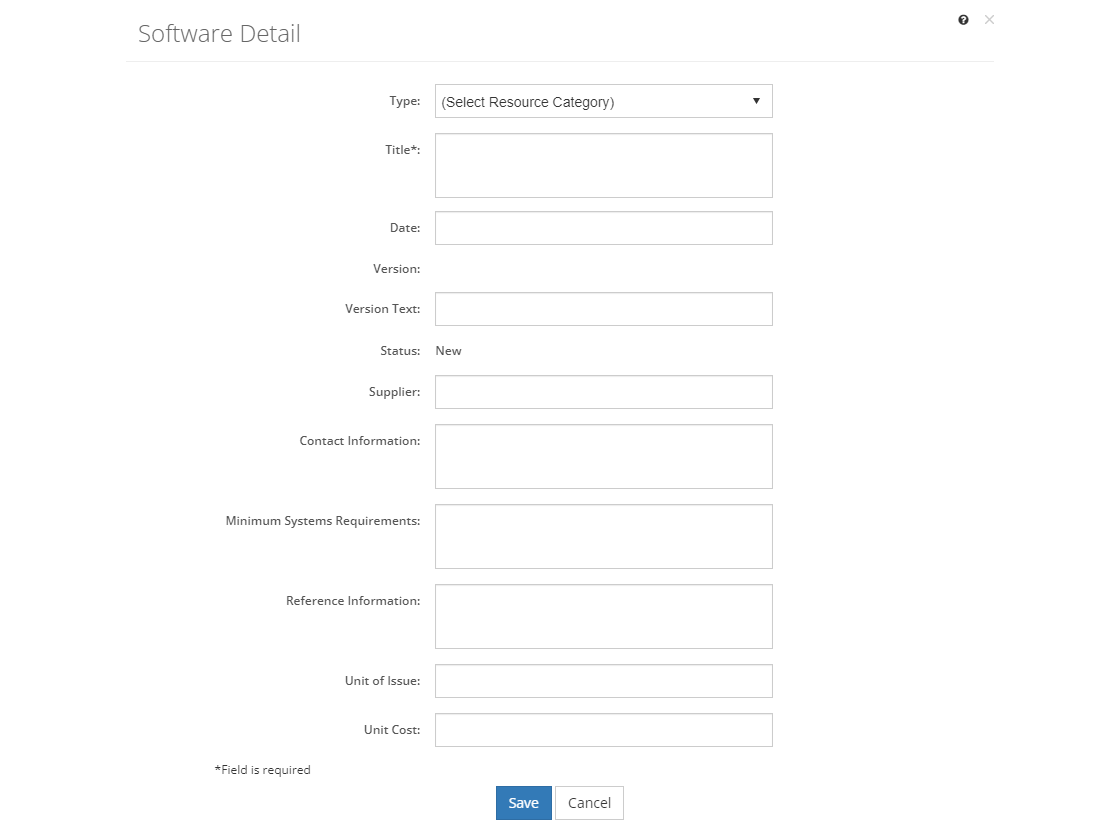
Figure 343: Software Detail Screen
Any of these options opens the Software Detail screen, ready for you to enter, review, or update the fields below. Then:
•To create a new software entry, select Save once you've entered all the information. Likewise, to keep the edits you've made to an existing software entry, select Save. This will return you to the list of software entries.
•If you do not want to keep the edits or create a new software entry, just select Cancel to close the pop-up.
•If you're reviewing a software entry, you can select Edit to make changes, select Approve to approve the software entry, or you can close the pop-up window by selecting the X in the top right of the pop-up.
Software Fields
Type
The Type or sub-category of the resource. The resource type allows you to further specify what kind of resource it is. You can set up the resource categories on the Customizations screens, to enable you to define groups of resources within the main categories.
Title
The Title or name of the resource. Resources are used or cited extensively in initiatives, specifically, on the following screens:
•Analysis - in the Training Needs Analysis and the Task Analysis.
•Design - in the Training Management Document.
•Develop - in the initiative contents: pages and paragraphs, sheets, and test items.
Date
The Date helps the buyer of the software to distinguish between different versions of the software. This may be important when different release dates contain different functionality of the software.
Version
The Version number of the resource. All resources start with version 1. Once a resource has been approved, changes can no longer be made, unless a new version of the resource is created. Then changes can be made as needed in the new version.
When viewing the resource item, you can view a previous version by selecting it from the Version drop-down.
Status
The current Status of the resource. Once the initiative that uses the resource is approved, then the resource is also approved. You can also approve a resource manually by viewing the resource on the Resources tab and then selecting Approve on the screen. You cannot approve a resource from the Edit screen.
Version Text
The Version Text of the resource. Unlike the Version field, this field is user editable, so you can enter the version number or text of the resource, if applicable.
Vendor
The Vendor of the resource, that is where you can buy it or find it.
Contact Information
The Contact Information of the vendor or other location, where you can get more information about the software.
Minimum System Requirements
The Minimum System Requirements helps the buyer of the equipment that will run the software to ensure that it is compatible with the equipment. Likewise, it will also help ensure that the buyer of the software is aware of the minimum requirements for the software to run.
Reference Information
The Reference Information provides any additional information about the software.
The Keywords that describe the resource. This information is used when you search for a resource using the Find field.
Unit of Issue
The Unit of Issue indicates how many items of the resource come together in a box or a pack. This helps determine how many resources need to be bought.
Unit Cost
The Unit Cost is the cost of buying one unit (e.g., one box of pencils, or a pack of paper) of the resource.